Many, many years ago, I bought a 20-ton press for changing wheel bearings. I had this idea in my head that I wanted to be able to do as much as possible on my car, and since I already had experience removing knuckle assemblies to change captive rotors (look it up, it’s horrible), I figured it would be a small step to learn how to change wheel bearings.
At first I experimented on a junkyard hub assembly. The results were not good, but I learned some valuable lessons. Later, the occasion arose to change a bearing for real. My dad’s car had developed a loud wobbling/grinding sound from one wheel, especially on turns. He lived with this for a long time, longer than he should have, so I finally jumped into action to change it.
This was a mistake. The issue was that the bearing in question was on one of the rear wheels, which rarely see any action on Subarus and are therefore frequently frozen in place by rust. Sure enough, I couldn’t even get the axle out of the hub splines. But, being inexperienced, I tried to force this. The slide hammer I rented wasn’t able to free it, and after stupidly trying to hammer on the axle, I ended up slightly mushrooming the end. I tried pressing it out using the press, but if I remember correctly, I think I actually bent part of the knuckle in the process. Serious rust! Eventually, we just ended up making a trip to the Subaru dealership, buying a new knuckle and hub ($$$) and then going to a parts store for an aftermarket axle. I can’t remember exactly how we changed everything, although the axle did actually come out later, funny enough. After getting some tips from a friend, I was able to press the bearing in properly using some metal sleeves I owned from a kit, and to this day that bearing is going strong (Koyo FTW!). However, because my parents paid for the knuckle and hub, it didn’t save them any money in the end. And unfortunately, the aftermarket axle shat itself a few years later, as it turns out that Subarus have a habit of eating aftermarket axles. So, if I’m being truly honest, my attempt actually cost my parents more money, as well as costing me a week of ridiculous stress.
Having more experience now, the moment I realized the axle was seized in the hub, I would have just thrown a new axle nut on and said, “Sorry, this is going to have to go to the shop”. Either that or just douse it in rust penetrating oil and wait until the following week. It’s amazing to me what some PB Blaster can accomplish when it’s been soaking for a few days.
I’ve held on to the press ever since, hoping that the lessons I learned would enable me to some day be able to change bearings at will, but for the most part, the press has been sitting around in pieces, taking up a decent amount of space.
Knowing how to do something is one thing. Doing it is another.
Fast forward several years and here I am again. I keep telling myself that if I change the bearings on my car, I’ll probably never need to change them again. Which is probably true. But in the process of freeing one of my own axles last Fall (for different reasons), I nicked the hub a little and want to replace that, plus after noticing how loud my front passenger wheel sounds when making u-turns or taking fast corners, I’m starting to think that bearing is legitimately starting to go. I have to get in there still to change the control arm and ball joint, and I feel like I may as well change the bearing while I’m at it.
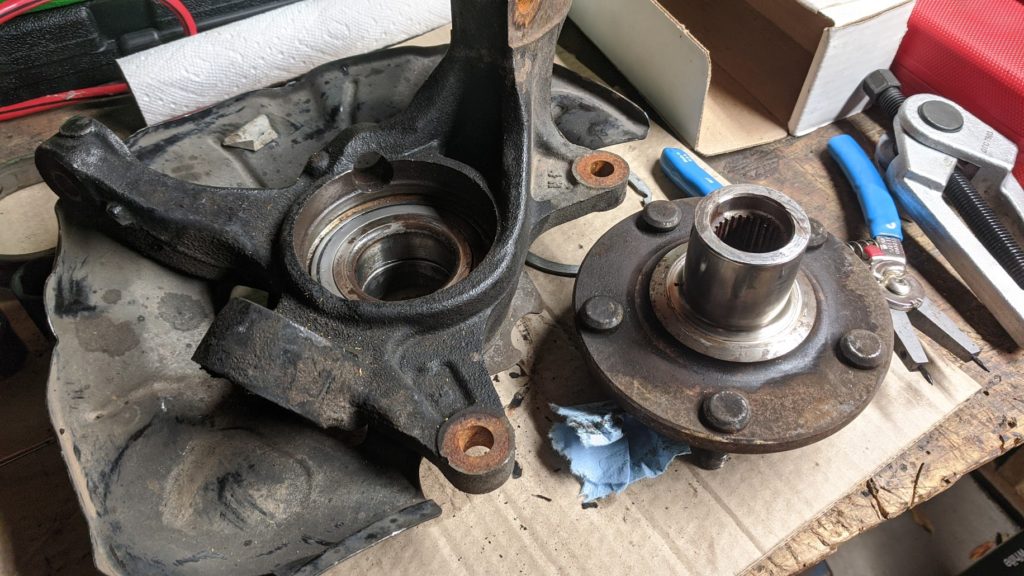
I bought a very expensive tool for this, that’s designed to allow you to change bearings with the knuckle assembly still on that car. It requires a good impact wrench, but using this tool, I was successfully able to remove the hub and bearing from a junkyard assembly I ordered online, and then was able to successfully replace the bearing with the cheapest crap I could find on Amazon, just to test the process. The hardest part was removing the old bearing race from the hub! Otherwise, it really wasn’t too bad. This is encouraging.
But let’s step back for a moment and really look at all of this. What if, instead of trying to tackle bearings, I had just decided long ago that I was never going to work on them? I wouldn’t have the press, or the press plates, or the huge-ass OTC bearing splitter (a misnomer – it just helps separating pressed-on shaft parts), or this new Hub Grappler tool (way overkill for a garage mechanic, but still way cheaper than a $1400 iPhone, and more useful IMO), or the ball joint kit I bought for its metal press sleeves. I might still have my impact wrench, but there isn’t much I’d especially need it for, but I wouldn’t have the huge wrench and 25mm socket needed to use the Hub Grappler, either, or all the extra parts like the snap rings and dust covers I bought just in case. At the end of the day…holy crap, what’s the actual cost of having the tools to change these yourself?!
As I was telling my roommate the other day, one option is to pull the hub assembly yourself, saving the cost of labor for that part of the job, then take it to an independent shop that will press a new bearing in for you. Bonus points if you can supply the bearing and want to go OEM. Can’t get to a shop? Put the assembly in a trash bag or two, stick that in your hiking pack, and hoof it to your nearest auto shop. There are options! There are other ways to do this.
Now, the DIY part of my heart loves this new tool I bought, and if it works well enough (and it probably will), I may ditch the huge press. Funny enough, though, it’s actually a great addition to the press since you can use these sleeves to properly position everything and not have to worry about how to fit the awkward shape of a knuckle into the press. But again, how much mass would I be saving if I had simply decided long ago that I didn’t want to take things this far? I believe somewhat strongly that possessions weigh you down, but I tend to turn a blind eye to tools. This is not a good thing, in my opinion.
As regards this project, I simply feel hesitant. My test on the junkyard assembly was completely successful, my impact wrench is up to the job and things simply worked. I think we’re good to go. But I’m also afraid that the axle on this side is going to give me issues, too, and if that happens I may have to replace the axle as a unit, which involves buying a retainer bracket from a dealership and possibly having to wait for that order to arrive. If that axle nut doesn’t want to come off and destroys the axle threads, then that shuts the whole project down for several days. Complexity is rarely your friend.
And that’s the issue. The more complex of a repair you attempt, the more things that can go wrong. And that’s why some jobs are better left to the professionals. It’s not that you can’t go out and buy all the tools you need, it’s that the ROI decreases the more complicated you go. I’ve seen some YouTube videos of people working in the rust belt, where sometimes changing a bearing means bringing out a beastly torch and basically melting the outer bearing races off, or using impact hammers just to try to break the rust. You need options when you are dealing with those sorts of things, and it makes sense for those guys because that’s their job. How badly do I want all of these tools, when I can otherwise just take the car in during the week and pick it up on the weekend in exchange for a few hundred dollars? (Okay, bearings are expensive to change, but this is for good reason)
On the one hand, learning new skills is nice; on the other hand, some skills are not worth the investment.
We’ll see how this project goes, but the line is slowly beginning to form in my mind: there really is a point at which it stops paying to DIY. I think I would have been better stopping before this a long time ago, but I have learned a few things in the meantime, and part of me suspects this could still be a useful skill that works in my favor. ROI isn’t everything, but I’m definitely paying closer attention.